BEGIN:VCALENDAR
VERSION:2.0
CALSCALE:GREGORIAN
METHOD:PUBLISH
PRODID://GCAC//203840
BEGIN:VEVENT
DTSTAMP:20260404T064512
VTIMEZONE:America/Phoenix
DTSTART:20260216T220000Z
DTEND:20260217T010000Z
UID:203840
SUMMARY:Basic Clay: February 2026
LOCATION:Grand Clay Arts Studio
DESCRIPTION:Basic Clay: February 2026 \n\n02/16/26 03:00 PM MT\n - 02/16/26 06:00 PM MT\Description:\nBasic Clay\n\nDates and Times: February 2 (3 - 4:30 pm), 9 (Noon - 3 pm), 16 and 23 (3 - 6 pm), 2026 (includes orientation/ monitor training and hands on learning using clay).\nPlease note the various times for each class. \n\nNumber of sessions: Four sessions. The first session is 1.5 hours, the remaining three sessions are 3 hours each\nCourse Fee: $60\nDescription:\nThis course provides hands on experience working with clay. These classes will teach you the fundamental elements of the oldest form of clay work. You will learn the basics of working with clay and gain an understanding of how and why clay works. Participants will learn to use slabs to construct platters and cylinders which they will then glaze. The end product is 1-2 completed pieces. \n\nThis class is for new members who may register after they receive an invitation. If you think you should have received an invitation but have not, please contact educoord@grandclayarts.com and request an invitation. Existing members who want to take Basic Clay as a refresher must contact educoord@grandclayarts.com and ask to be invited. Once you receive an invitation, you may register.\n\nThe very first class will cover basic etiquette in the clay club, review of equipment, and monitoring. Bring your login and password for the Grand Clay Arts website, along with your door code to the studio, and a credit card to purchase your beginning clay kit and clay.\n\nParticipants will learn:\nStudio protocols \n- Tour studio, available supplies, forms, texture tools, molds, slips, cooking spray, etc\n- Understand process for drying project, firing (bisque and glaze)\n- Understand all clean up expectations (studio, glaze room, sinks)\n- Understand proper use and maintenance of molds. (Use of pin tools vs wood tools, spray vs powder, clean up)\n- Understand marking pieces throughout process (while drying, directly on piece, etc)\n\nUse of studio equipment: \n\n1. Learn to use slab roller \n2. Learn to compress clay, and why \n3. Learn to wedge clay, condense clay \n\nConstruct simple hand built pieces: \n- Make a hump and/or slump piece \n- Make a cylinder piece \n- Learn tips for smooth edges, removing shards, and wet sanding techniques for greater success \n- Learn managing when to take piece off hump/ slump mold\n- Learn to apply texture\n-Learn to bind and bevel seams\n- Glaze using studio glaze \n\nHands on sessions: \n1: Make a simple, small hump or slump piece \n2: Make a simple cylinder piece \n3: Glaze 1-2 pieces with studio glaze \n\n\nMaterials: \nAll necessary tools should be available from the Grand Clay Arts supply room. During first class you will purchase (bring credit card):\n\n 25# bag of clay (B-Mix with grog or Speckled Buff)\n Beginner's Tool Kit \n\nAdditional supplies you may want to bring:\n\n\n Small tool box or tote box or Rubbermaid container\n Apron\n Flexible ruler\n Post It Notes\n Sharpie Marker\n Pencil\n 4x6 Spiral Notebook\n Small paint brush to apply magic water or slip\n\nMark your last name with permanent marker on all tools and clay. \n\nClass Information: \n\n\n Skill Level - Beginner\n Number of Students - Minimums and maximums below 8 students determined by instructor. \n\n\n\n\n\n \Location:\nGrand Clay Arts Studio\n\n,
X-ALT-DESC;FMTTYPE=text/html:Basic Clay: February 2026
02/16/26 03:00 PM MT - 02/16/26 06:00 PM MT
Description:
Basic Clay
Dates and Times: February 2 (3 - 4:30 pm), 9 (Noon - 3 pm), 16 and 23 (3 - 6 pm), 2026 (includes orientation/ monitor training and hands on learning using clay).
Please note the various times for each class.
Number of sessions: Four sessions. The first session is 1.5 hours, the remaining three sessions are 3 hours each
Course Fee: $60
Description:
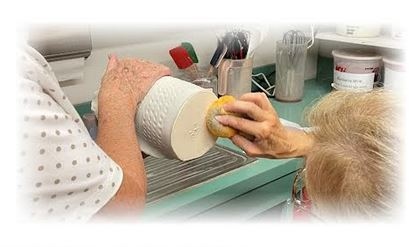
This course provides hands on experience working with clay. These classes will teach you the fundamental elements of the oldest form of clay work. You will learn the basics of working with clay and gain an understanding of how and why clay works. Participants will learn to use slabs to construct platters and cylinders which they will then glaze. The end product is 1-2 completed pieces.
This class is for new members who may register after they receive an invitation. If you think you should have received an invitation but have not, please contact educoord@grandclayarts.com and request an invitation. Existing members who want to take Basic Clay as a refresher must contact educoord@grandclayarts.com and ask to be invited. Once you receive an invitation, you may register.
The very first class will cover basic etiquette in the clay club, review of equipment, and monitoring. Bring your login and password for the Grand Clay Arts website, along with your door code to the studio, and a credit card to purchase your beginning clay kit and clay.
Participants will learn:
Studio protocols
- Tour studio, available supplies, forms, texture tools, molds, slips, cooking spray, etc
- Understand process for drying project, firing (bisque and glaze)
- Understand all clean up expectations (studio, glaze room, sinks)
- Understand proper use and maintenance of molds. (Use of pin tools vs wood tools, spray vs powder, clean up)
- Understand marking pieces throughout process (while drying, directly on piece, etc)
Use of studio equipment:
1. Learn to use slab roller
2. Learn to compress clay, and why
3. Learn to wedge clay, condense clay
Construct simple hand built pieces:
- Make a hump and/or slump piece
- Make a cylinder piece
- Learn tips for smooth edges, removing shards, and wet sanding techniques for greater success
- Learn managing when to take piece off hump/ slump mold
- Learn to apply texture
-Learn to bind and bevel seams
- Glaze using studio glaze
Hands on sessions:
1: Make a simple, small hump or slump piece
2: Make a simple cylinder piece
3: Glaze 1-2 pieces with studio glaze
Materials:
All necessary tools should be available from the Grand Clay Arts supply room. During first class you will purchase (bring credit card):
- 25# bag of clay (B-Mix with grog or Speckled Buff)
- Beginner's Tool Kit
Additional supplies you may want to bring:
- Small tool box or tote box or Rubbermaid container
- Apron
- Flexible ruler
- Post It Notes
- Sharpie Marker
- Pencil
- 4x6 Spiral Notebook
- Small paint brush to apply magic water or slip
Mark your last name with permanent marker on all tools and clay.
Class Information:
- Skill Level - Beginner
- Number of Students - Minimums and maximums below 8 students determined by instructor.
Location:
Grand Clay Arts Studio
,
PRIORITY:3
TRANSP:TRANSPARENT
BEGIN:VALARM
TRIGGER:-PT5M
ACTION:DISPLAY
DESCRIPTION:Reminder
END:VALARM
END:VEVENT
END:VCALENDAR